|
|
How to build a basement.
Unless you remember them clearly, re-read the pages about
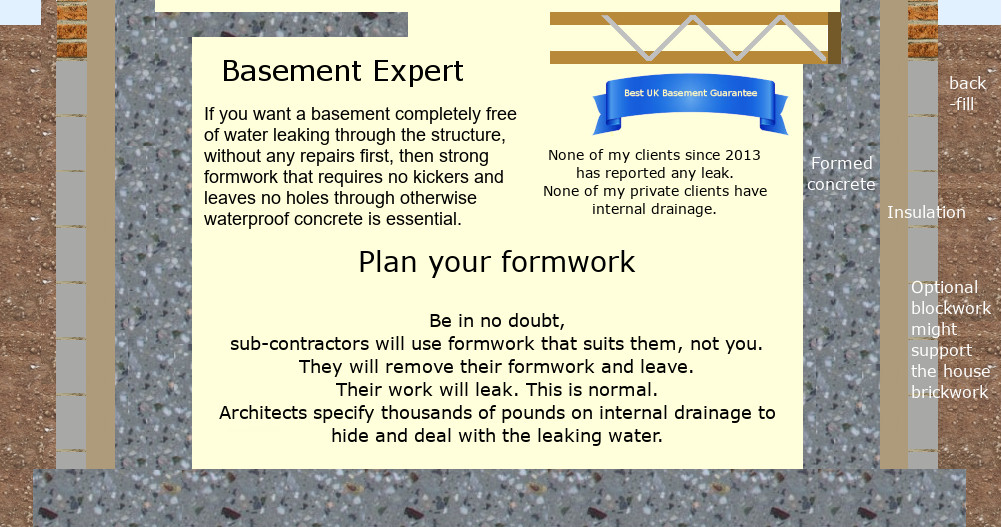
BS8102 has changed, for the better.
You must repair the leaks through your structure.
Follow these pages and you won't have any leaks to repair.
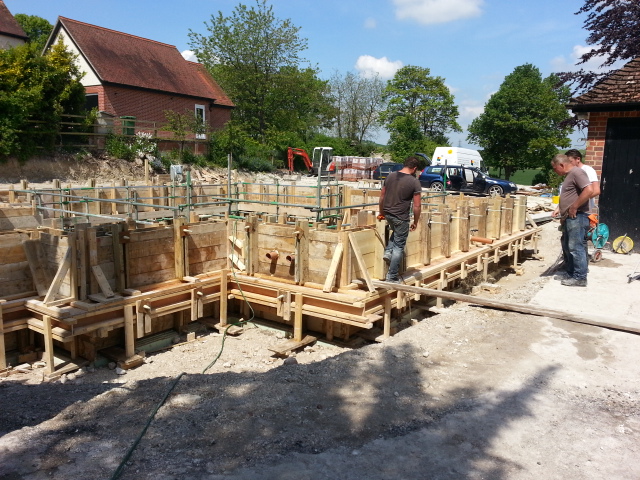
This is the page about choosing and buying in your basement wall formwork.
The formwork build manual is the next page.
|
|
|
There are a few choices, completely different ways to form walls.
If you have already decided to use my way with my resin rods and timber please click here to miss this description of other choices and go straight to the good stuff.
-
Traditional plywood and 4x2 formwork or hired-in system formwork.
It's amazing, but Professional formwork carpenters will always think how to build a basement is with a system that leaves hundreds of holes through the structure. They use and re-use a steel threaded rod through a plastic sleeve to hold the two sides of formwork tightly together.
That is what the carpenters always want to use but all they do is put the formwork up.
Usually, professional formwork carpenters
-
DO NOT pour the concrete
-
DO NOT strike the formwork (including pulling hundreds of nails out of timber formwork and damaging timber in the process)
-
DO NOT fill the holes
-
DO NOT fill voids in the concrete
-
DO NOT repair leaks
|
|

|
So they don't even know what difficulties they leave for others to put right. They only care about themselves. They do not know how to build a basement not to leak, even if basements are all they do.
Traditional formwork carpenters, who think they know exactly how to build a basement, will usually commit two other sins that suit them rather than their client.
-
They will form a kicker. A dwarf wall to clamp their formwork against. But the kicker will be very likely to leak and incredibly difficult to repair. A kicker is for your carpenter's benefit. Not yours. I have a page about kickers, already linked to at the top of the page
here.
-
They will fill the wall with concrete to full height but in many sections, meaning many joints. Because narrow sections of wall and many concrete pours means that they buy or hire less formwork and use the same stuff repeatedly. It is for their benefit, not yours. Using the formwork many times is proof they do not know, or care, how to build a basement that will not leak.
This means so many issues for the client.
-
Lots of vertical joints, lots of expensive hydrophylic strip that won't work everywhere and lots of leaks.
-
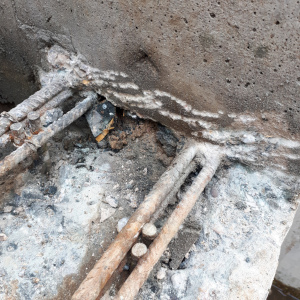
Lots of voids in the concrete at the bottom of the wall where they
-
Didn't get the concrete to the bottom of the formwork in good condition because it crashed past too much reinforcing steel, which got coated in cement, sand and water paste, and the stones got to the bottom surrounded with voids instead of sand and cement.
-
Didn't vibrate and compact the concrete at the bottom of the wall properly because they found it too hard lifting up a heavy vibrating poker (some weigh 25kgs) over 3m every 20cm along the wall. Plus pokers tend to get tangled up in the steel before they get 3m down inside formwork, so the bottom concrete gets missed and air remains inside it.
Your design team might have specified a waterproof concrete with a very trustworthy guarantee and a product backed by a BBA certificate. But the truth is, these products do not prove they waterproof concrete, they do not claim to waterproof concrete (used beneath ground in a basement retaining wall) and they do not guarantee anything but the sound concrete. Therefore they do not give you any resolution for poor workmanship. Believe me. Formwork carpenters who build basements all the time do not know how to to build a basement to the standard you require.
I bang on about Caltite at great length on another web site, www.waterproofconcrete.co.uk.
You will find a shorter description and a link to the Caltite guarantee here.
Another is Sika. A customer of mine got Sika to quote but he used me. You can open the Standard Sika Specification using the link. You have to get all the way to page 26 before you find they exclude poor workmanship and voids. Voids obviously includes the holes carpenters deliberately leave through a wall as well as voids due to poor compaction, which Sika call honeycombing. Sika specification - Standard (1).pdf.
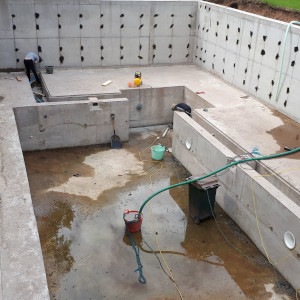
The drawing below was marked up by Pudlo.They wanted 5 different concrete pours, as you can see.
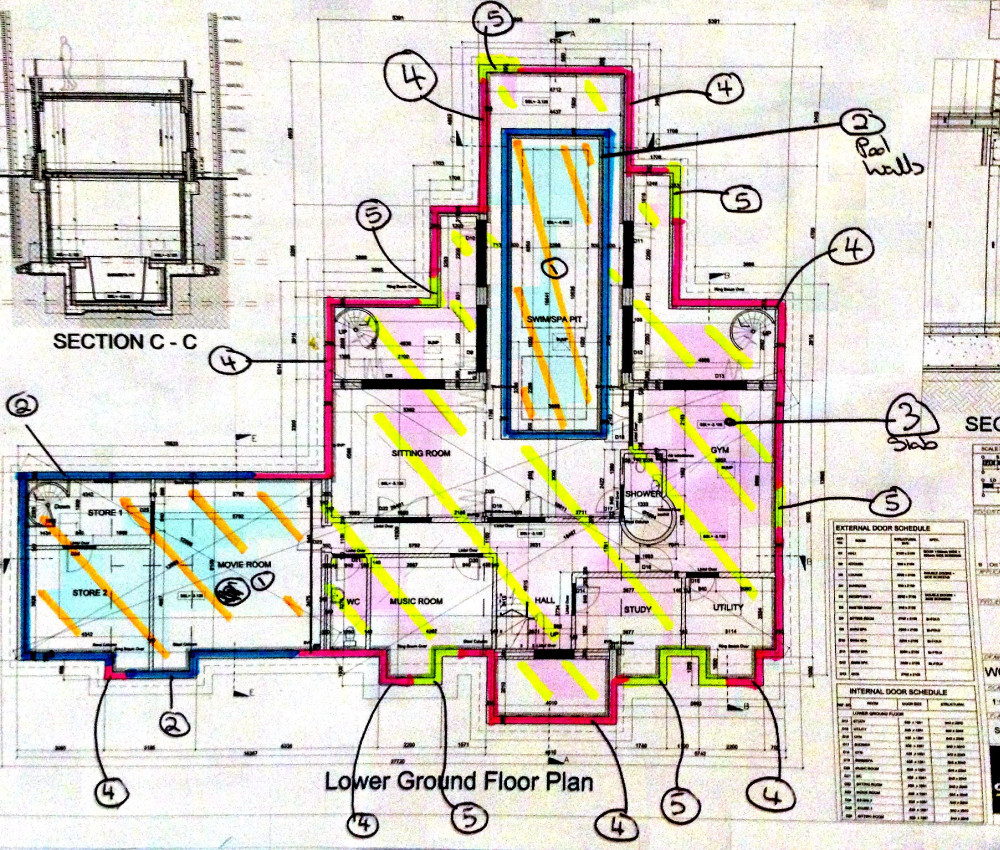
Every change of colour from red, black, green and blue is a vertical joint. The concrete will want to cool, shrink and crack away from vertical joints. Joints enable Pudlo to sell you a lot of expensive joint strip.
I would want 5 concrete pours as well, because it is a complicated project with a pool deeper than the basement, but my 5 joints would be completely different. All my joints are horizontal. They only need a scabble and a clean and gravity will prevent the new concrete from pulling away.
I do not require you to buy any expensive joint strip.
Pudlo (and most others)
-
Structural floor of the pool and movie/store area.
-
Pool walls and most wall around movie/store area.
-
Main structural floor slab.
-
Fairly long sections of retaining walls.
-
Fairly short infill pieces to complete retaining walls.
This is a reasonable way to prevent concrete cracking due to thermal shrinkage when the wet concrete cures, but ONLY IF the short sections are very short (no more than 600mm) so that when they shrink they don't create a gap either side.
Pouring concrete 3m high causes leaks through the concrete around the wall bottom, mainly through voids, and this many vertical joints will have leaks.
You can see that the contractor hires in a bit less formwork than the full perimeter. In practice, he might shorten the long sections and lengthen the short sections to hire in even less. But, whilst he will hire even less formwork, longer short sections will shrink so much that sizable gaps will open up at joints.
This drawing has been marked up by someone pandering to the carpenters, with no thought about excavation, keeping sides supported or even properly understanding what they aim to achieve.
|
|
Basement Expert
-
Structural floor of the pool only. I wouldn't even have the store area excavated yet because it will be left open a long time and tend to collapse.
-
Pool walls.
-
Main structural floor slab.
-
Retaining walls to between half height and a max. 1.9m high.
-
Retaining walls to the top.
It might be the case that I require extra 10mm bars horizontally through the walls to control the thermal shrinkage.
Whether I need extra steel depends on wall thickness and cement type.
Either 200mm thick walls or concrete made with blended cement would not need this extra steel.
I would not have any vertical joints.
Horizontal joints aren't a problem like vertical joints because the concrete shrinks downwards. Horizontal joints never open up.
|
|
There are many reasons you would usually have many leaks to deal with and pay to resolve later - whether fixing every leak or, more likely, by paying out £thousands for internal drainage that, if it has lots of water to remove, will break down and flood your basement as pumps fail, pipe joints fail or you get a power cut.
99% of reinforced concrete basement structures leak because of one or more failures of good workmanship. The client picks up the bill for fixing all leaks through poor workmanship.
And in my experience, the typical tradesman doesn't care about the extra work he creates for those following on.
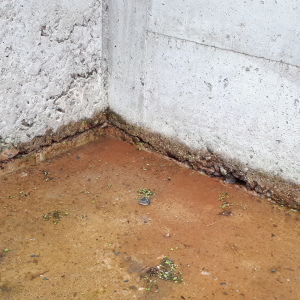
This customer had to pay another £10,000 to get the 400 holes filled and the leaks stopped where the concrete joints hadn't been cleaned and the very expensive hydrophylic strip was simply bypassed by water getting in. You can see that over time the water getting in washed out the dirt they hadn't cleaned out.
-
Blockwork walls, whether two faces of blockwork or hollow core blocks.
Either will leak.
Hollow core blocks will leak because water will get through the part of the block that is continuous front to back and water will get in through the mortar or open joints between blocks.
If you have two faces of blockwork and concrete in between you might think you could use waterproof concrete, but you can't because:
-
The blockwork will fall over when you put concrete inside unless you use plenty of wall ties and only fill about 3 courses each time.
-
The bricklayer will drop mortar inside as he lays the blocks. You may well have a hydrophylic strip in the bottom but it will be covered in porous mortar droppings. Your waterproof concrete could not get right down to the slab beneath because it cannot displace the set-hard porous mortar droppings.
Blockwork formwork is hopeless for basement retaining walls. It is a wasted opportunity to stop water getting in for no extra cost.
It is mentioned in the new BS8102 as a bad choice.
-
ICF Insulated Concrete Form.
Another very bad way to build basement walls. Also mentioned in the new BS8102 as a bad choice.
I have a page explaining why ICF will cause you misery here.
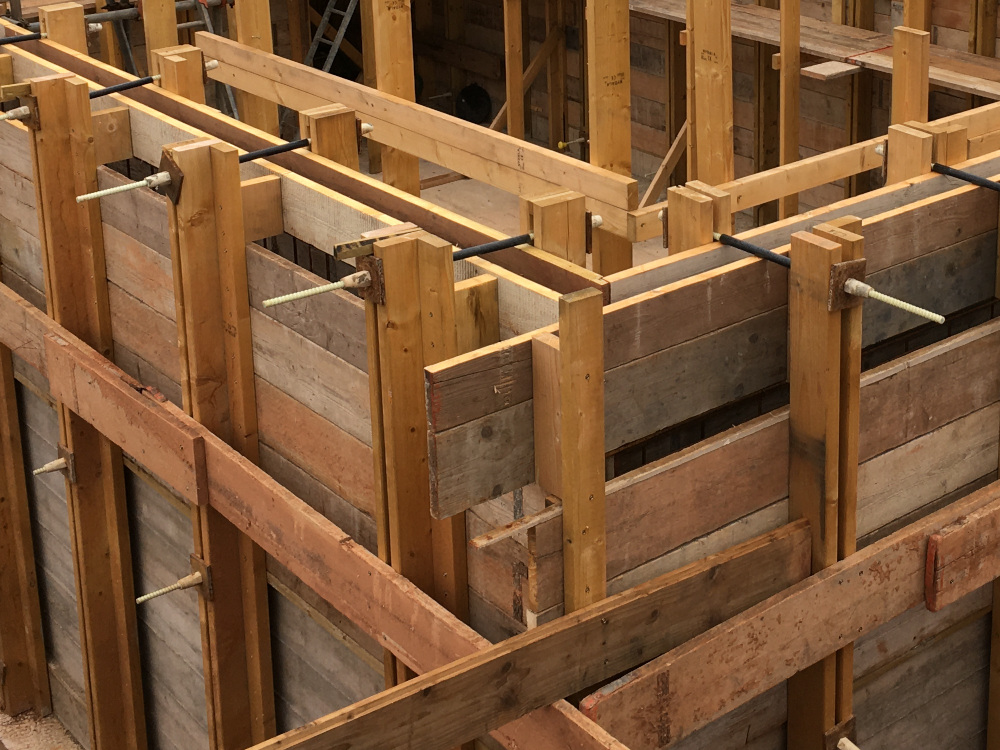
Planning to use my resin rods in your formwork so you leave no holes.
If you are going to build the formwork yourself, I would like you to think about doing your walls right first time and having nothing more to do after they are poured. Make the whole process as easy as you can.
There is no need to leave anything to repair. No need to leave holes, voids or leaks.
You can choose the timber you used based upon what you can re-use again or sell on for the best price.
However you must use 4x2 for the triangular supports and 6x2 for the strongbacks.
|
|
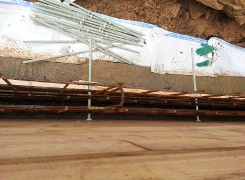
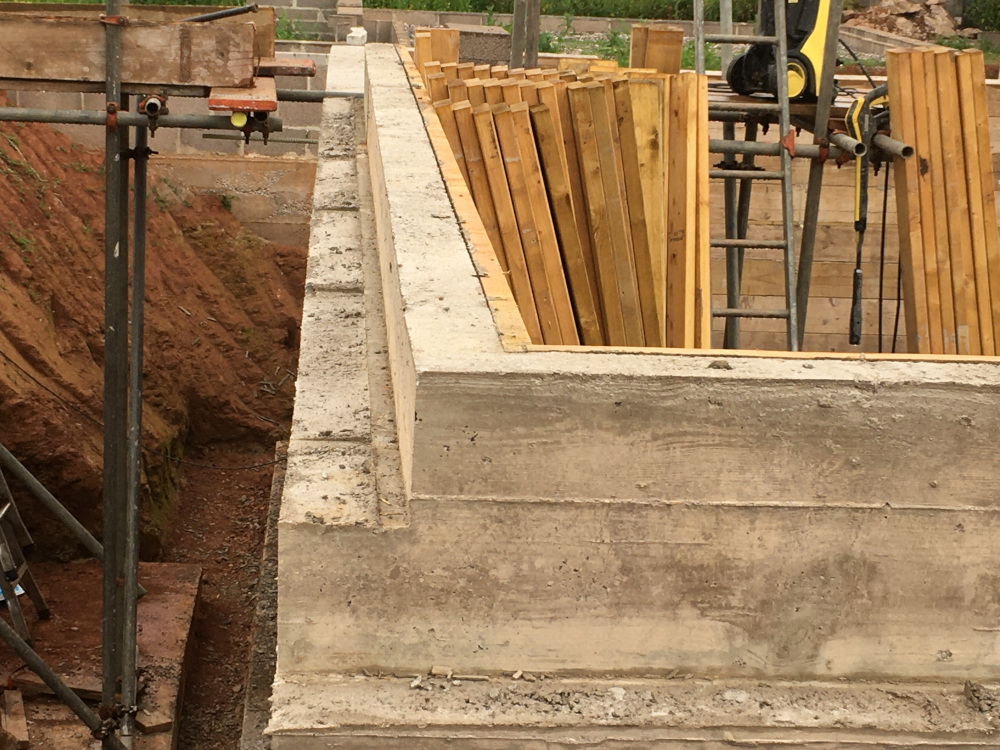
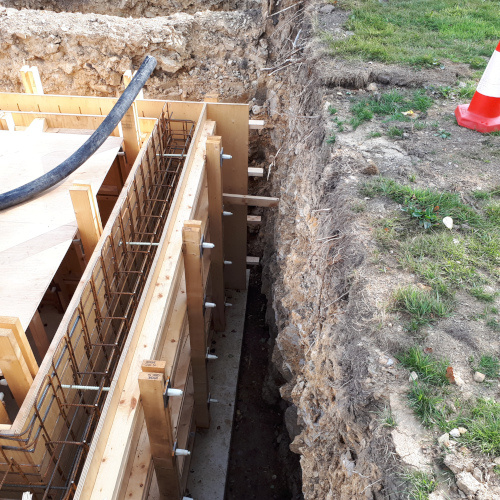
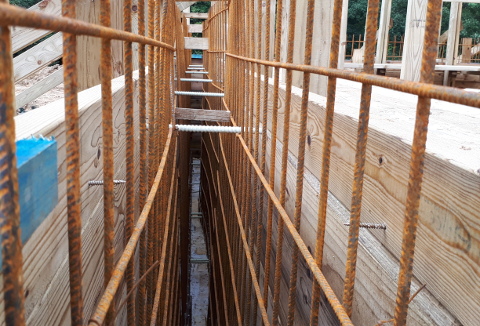
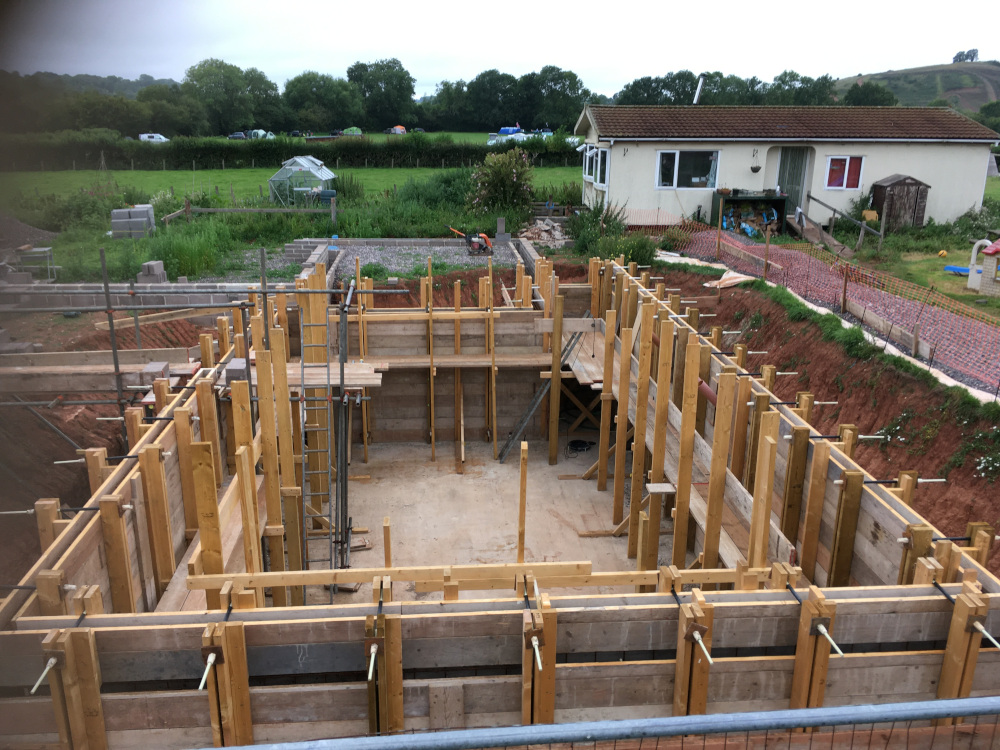
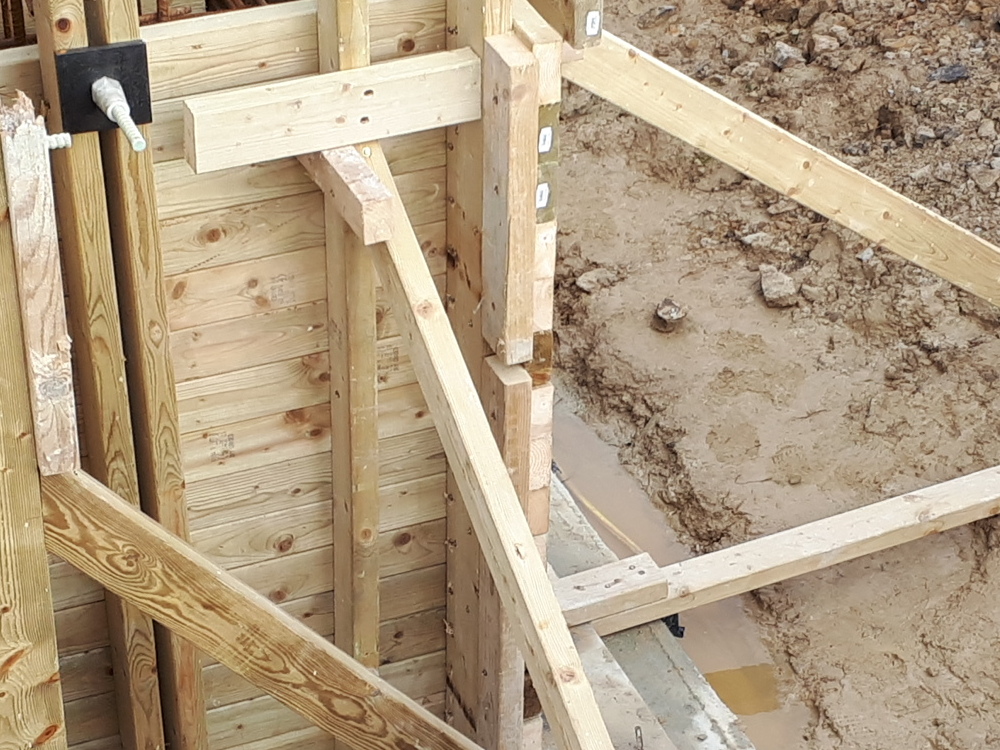
The formwork starts with a string line along what will be face of concrete wall.
Next the floor plates are screwed down to the concrete the correct offset for the uprights and the wall form timber.
No kickers because kickers leak.
After one course of boards, I would use 980mm lengths of 18mm roof batten and leave 18mm gaps. These give you 18mm square gaps for rods without having to cut valuable timber you will re-use.
|
|
|
Carry on.
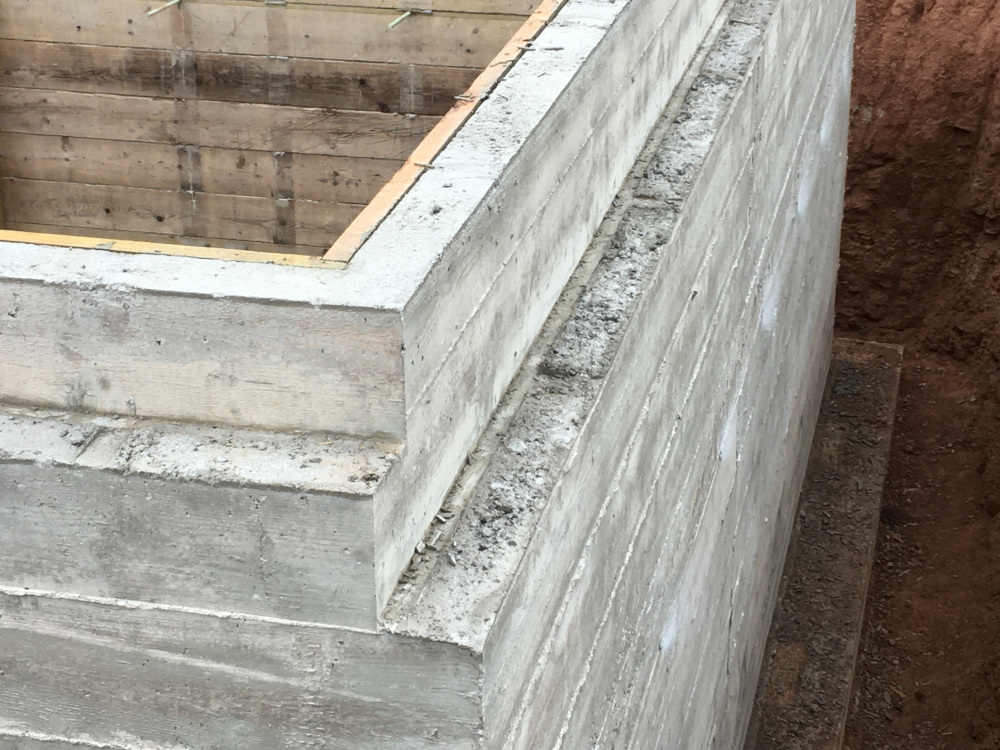
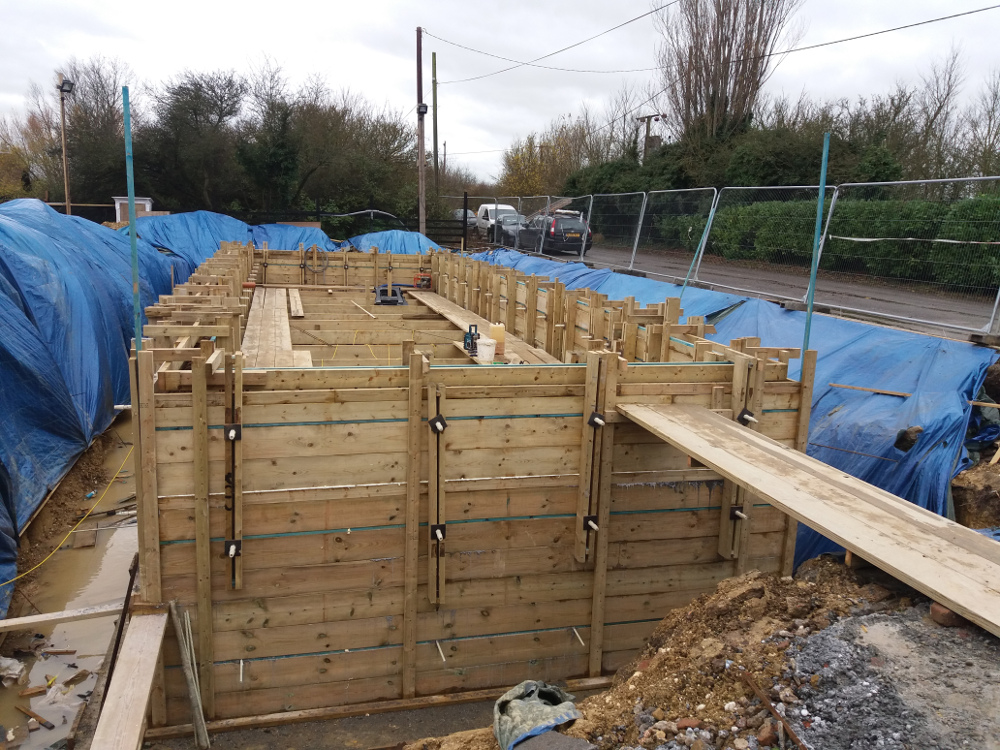
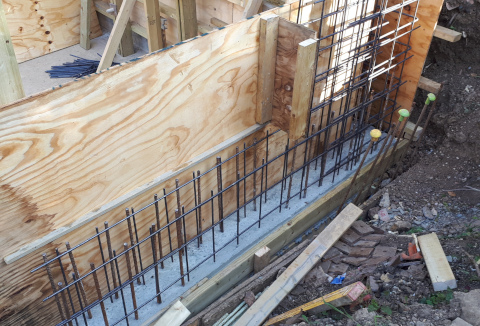
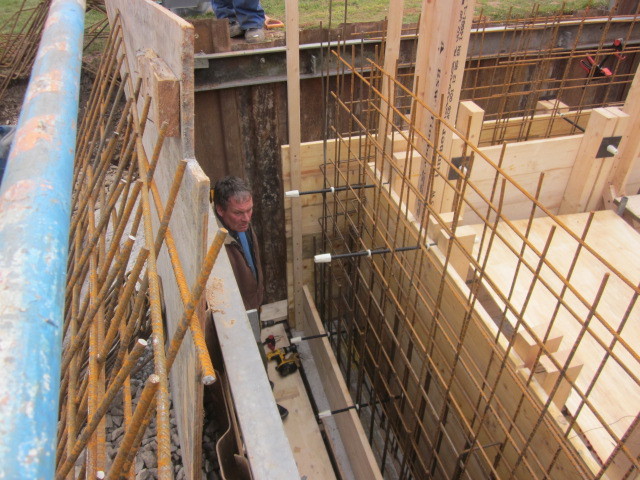
Usually, you want to form at least half height and no more than 2m tall for the first pour.
This is so that you can get the concrete to the bottom inside in good condition and vibrate it to the bottom properly.
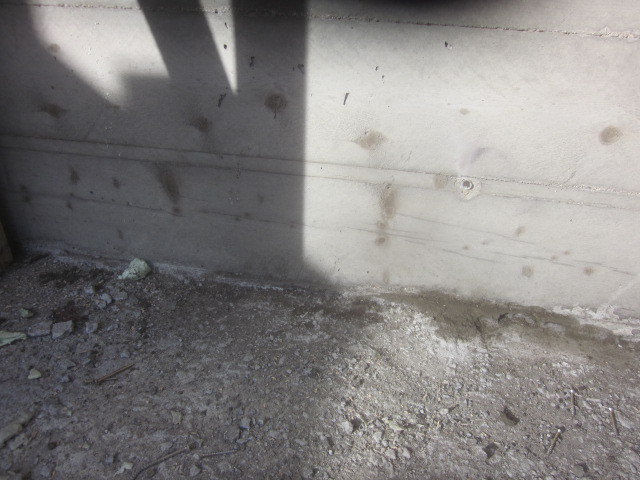
A clean scabbled joint, no kickers and no more than 2m high removes most of the reasons concrete leaks.
If your wall is a constant thickness bottom to top, divide the pours about half way.
|
|
|
If the wall is a bit complicated, you might have a corbel outside and an upstand inside, then make the more complicated top pour less than the first.
You might want to deliberately stop the first pour where it makes continuing easier, for instance at the top of the corbel. If one pour finishes top of corbel, you don't need to cap your corbel, you can just trowel it off. On the other hand, this team backfilled the first pour before they carried on.
If you cap a corbel or cap a ledge, drill small holes through the timber to let the air out when the concrete is trying to get in. I would say 4mm holes on 100mm centres at the farthest point your concrete has to reach.
If you think about it all, you will do better than if you didn't think about it all.
|
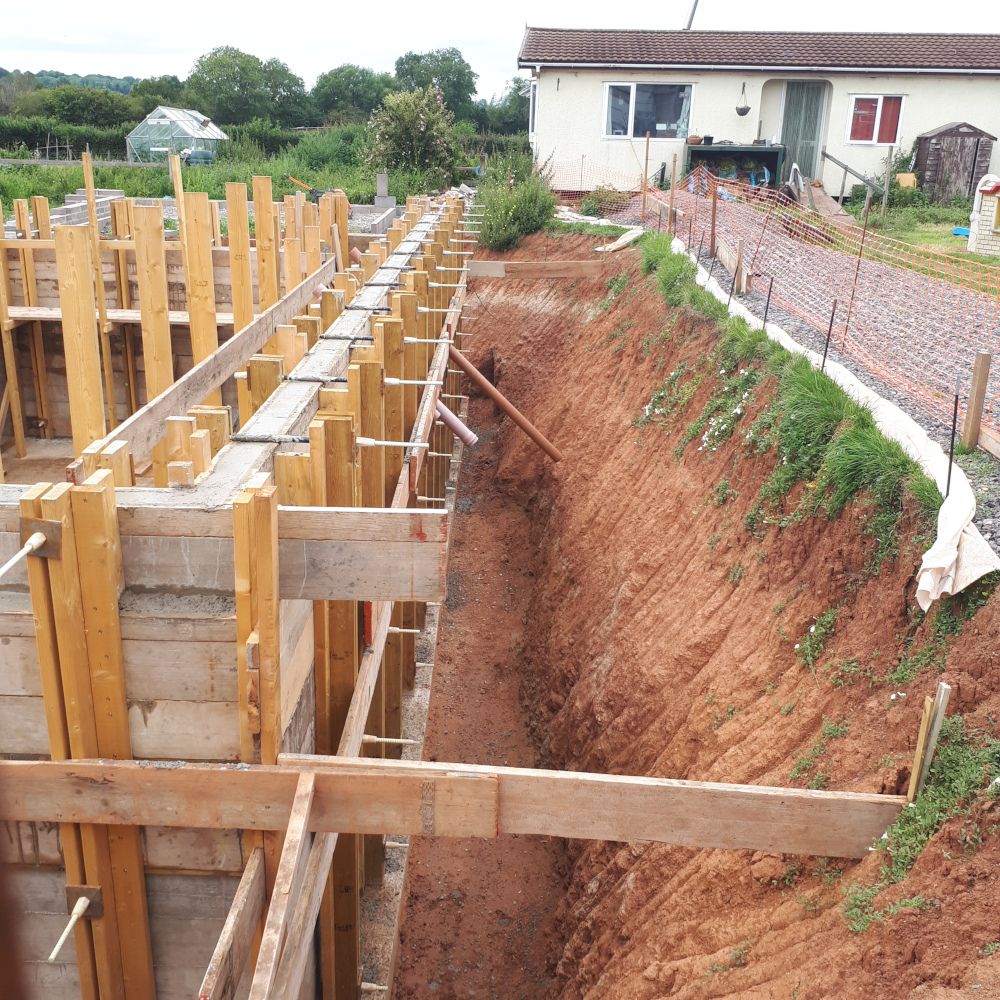
This basement is partially under the house and the house is much bigger. The outside tops to the basement vary because some will take exterior stonework and others precast concrete floor. The floor over the basement will probably be engineered timber joists.
You need to have a clear idea in your head about what your basement will support above. It is usually a lot easier if the basement is the same footprint as the house above it.
| |
You still have a few other things to think about.
-
Three, four or five rows of rods?
-
Finish the formwork exactly at top of concrete or go a bit higher and mark the top of concrete level inside?
You make a lot less mess this way, plus you don's always have to go round with a bucket of concrete topping up to replace the concrete the poker displaced.
-
Thin nuts inside to control the concrete width: yes or no or where?
-
How to form an upstand.
-
Your choice of timber and your choice of scaffold.
|
1.
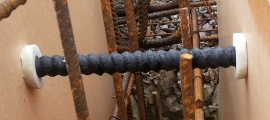
Rods are 1m long and cost £3.50 each, whole nuts cost £2 each. Waler plates cost £1.00p each for the first 4 weeks including delivery and collection, then 10p per week or part week after that.
The easiest way to spend least money with me is to have 3 rows of rods, leave the first half of formwork in place (with pairs of 6x2s tall enough for the whole wall), one nut on each end of each rod, no thin nuts - and re-use the timber.
You don't strike any formwork until the whole wall has hardened. You slice off the nuts and throw what's left away.
But other customers thought differently. In particular, some customers try to buy less timber so they need more resin rods.
Casting concrete against piles definitely requires more than 3 rows of rods because the weakest link is the rods pulling out of the piles because the piles themselves are made with relatively weak concrete.
That entire far side is one side of timber formwork tied to concrete piles that are the second side of the formwork.
I think we used 4 rows for the first pour, then the top two of those rows again with one more row near the top.
This was massively cheaper than hiring in a system of single sided formwork.
|
|
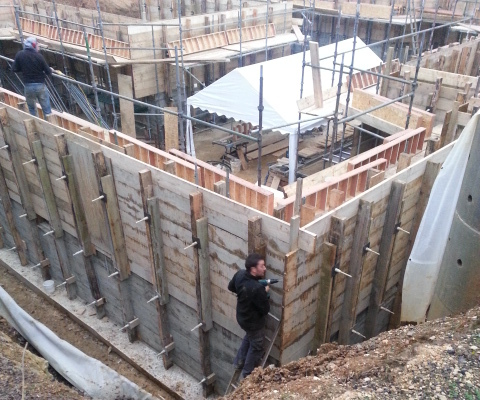
This customer wanted to be quite certain nothing moved.
He got 25mm good quality plywood cheap and used 4x2 uprights not the 6x2s I would have used. He used 4 rows of rods where 3 would do (had he used 6x2s).
However, he absolutely succeeded.
Nothing moved.
No one knows how strong formwork needs to be. But if it wasn't strong enough it can move or burst and you have a lot of work chiselling concrete out.
|
|
I use this same picture again a little lower down, before you think you are going mad.

|
This customer decided that he would try to only pay for 2½ rows of rods. He used the lower two rows twice and he wanted a 50% refund on a third, top row that he used only once and was able to return because he kept them clean in plastic sleeves.
He also thought about how to buy the least timber.
The first two rows of rods supported the first wall pour to about 1800mm high. When he poured to the top he only added the top row of rods in plastic sleeves. This is how he used two rows twice.
Nothing wrong with using two rows twice in this way, but he would have had an easier time and neater finish if the top row of rods was one board down from the top, and if his formwork was a few inches higher than the top of the wall.
It is impossible to fill formwork to the top, then stick a great big vibrating poker inside, without a lot of spillage, waste concrete and formwork to clean of concrete. Plus you have fill the wall to the top with concrete from a bucket.
This is hard work and it takes time. You might not mind the hard work, but if the concrete is setting before you get all this extra work complete you will not get a good finish.
Some days after the first, lower, pour had cooled, he loosened off the two rows of nuts to retrieve most of the timber, tightened the nuts back up, used the retrieved timber to build his formwork to the top and he put his top row of rods just above the formwork in plastic sleeves so that he could get some money back returning me 38 rods.
|
I don't like to buy back anything previously used.
In this case I was always there to train and supervise so I had to give in. But 38 rods at £3.50 each is only £133. To get half of that back, £66.50, he had to try to level the top of his wall with all the rods in the way; and if the rods had been higher up he might have needed extra timber and lifting the concreting pipe even higher to move it along would have meant more concrete mess.
Was it worth it?
Definitely not.
If you are building your own basement your mind needs to be on the biggest issues first then the progressively smaller issues. By concentrating so much on saving £66 I would say most people would miss something else that cost them a lot more.
I have known people save a few hundred pounds only to find it meant they needed a big crane costing thousands of pounds. Not because the small saving caused a huge problem. Because they missed the opportunity to lift something in easily because their mind was on something relatively trivial.
In this next photo you see shorter lengths of 6x2, so the nuts need to be undone and the 6x2s slid up to the top for the top half of formwork.
And you can see it all here just before the second wall pour. Notice the thin blue lines which are roof batten cut between the rods.
Except there are errors to avoid in this last photo.
-
He used two boards before the first row of nuts and the concrete pushed those two boards out very slightly because he did not fill sufficiently higher than the first rods. Had he used thin nuts in his middle row that might not have happened. But the proper solution is to have the first row of rods above the first board instead.
For the second pour he had extra bracing on the outside and over the top to keep the wall width correct. It wasn't really necessary, but it did make steering the concrete pump a lot harder, it cause a lot of unnecessary mess and wasted some concrete and it made floating the top off neatly a lot more difficult and slower.
-
He cut 6x2s in half.
He needed to buy a lot fewer 6x2s but they were relatively useless in short lengths to re-use, neither could he sell them on as profitably as long lengths.
-
In other ways he went over the top.
The problem with the horizontal timbers over the top, maintaining the wall width, are that the concreting pipe and the vibrating poker have to be pulled right out before they can be moved along. This means extra work, extra time and unnecessary mess as concrete dribbles everywhere.
Whereas if he had cut 6mm of each of the top nuts to use inside as thin nuts he wouldn't have needed to lift the concreting pipe up and clear of the cross timbers as he went round and round concreting, and he would have made less mess.
2.
Top of formwork.
This customer, like the one above, formed his timber so that top of timber was top of concrete.
Whereas, when he poured the wall the first time, the formwork was higher than the concrete he put in that time.
I want you to look at the two photographs above very carefully, in this order. (Unfortunately I never get photos of the concrete going in because I am always too involved).
-
The pump comes round and the form is filled with concrete to the top. This concrete might have overflowed slightly but it contains air. A bit like the narrow ledge that hasn't been scraped level yet.
-
The poker is inserted to remove the air and the poker displaces about 2 litres.
-
2 litres of concrete spills out every time the poker is inserted, every 200mm to 300mm. The level of the top of concrete is now 20mm to 40mm low and it needs topping up. This means finding some concrete, putting it in a bucket, carrying it round and trowelling it in before tamping the air out.
All this before the concrete you have in a pile nearby starts to set.
-
Sometimes the concrete can be partially topped up with the concrete pump pipe being swung back where it has been, but it is just as likely to overfill 40mm deep and more concrete spills out.
When you pour your wall the first time the formwork will most likely be higher than the concrete. You needn't worry about the concrete being dead right because you will add more later. But what you will notice is that you did not spill any concrete.
Therefore
consider building your formwork a bit higher to completely avoid rushing around topping it up at the end.
There are many ways you can mark the correct concrete height inside, for instance roofing batten to pour concrete to the bottom of, or long screws screwed through the formwork to provide a visual guide to the man on the concreting pipe.
What I am asking you to weigh up is will you have 6 strong men who can do all this work in good time before the concrete sets, or will you prefer to pay only 4 men in which case getting your concrete just right might take too long?
Is it worth compromising the finish of your basement concrete, in terms of accuracy as well as appearance, trying to save £300 on two fewer men and trying to get a small refund from me?
If your basement is costing you £80,000 do you want it to be a disappointment for such a small saving and two hours extra hard work?
It is entirely up to you.
Screws at top of concrete level.
 |
|
Underside of batten shows us top of concrete.
|
3.
Thin Nuts.
More on this page.
I would:
Use thin nuts about 20% of the time to control the width inside.
I would cut one thin nut, 5mm to 6mm, off one big nut as I need them. (Using a diamond blade and being careful no one breathes the dust).
That way you don't buy any thin nuts from me and I promise you 60mm of nut will always be strong enough. No one has needed all 70mm as far as I am aware.
4.
How to form an upstand.
There are two clear choices:
The formwork is built up in a single width. Void formers are fixed inside. Air holes beneath the void formers are drilled through the formwork so the concrete can get into the corners.
 |
|
You use your timber to create the two widths and the two top levels.
The disadvantage, clearly, is that to get the lower concrete level correct you will spill some concrete as you vibrate the higher level and you will manually have to clean the lower level off with a trowel.
The void formers create a better finish, especially if the upstand formwork is a bit high with the top of concrete level clearly marked.
|
But whether the slightly extra work is worth it probably depends on the size of the job.
These void formers were used on a huge basement. If the team had to go around 80m of wall to manually trowel concrete to get both levels right the concrete would have set before they did it all.
Whereas most basements only have about 35m of wall so the team have less to do in the limited time and they could probably fill in low spots and scrape off high spots in the time available before the concrete gets too stiff.
5.
Choice of timber and choice of scaffold.
The secret to saving money on timber isn't saving money on timber. It is re-using timber yourself or buying cheaper in whole packs and selling it on, used, for as much as you paid for it, but in smaller quantities.
Don't forget any VAT obligations.
Keep records. You might have to prove to the VATman later it was not sold on because you used it again or you had to scrap it.
You need:
-
A timber that creates the face of concrete.
If this is 18mm shuttering ply it needs 4x2 ribs on 400mm centres as well or else the curvature under load is too great.
I have found scaffold boards and 6x2 to be excellent. Scaffold boards need the steel straps removing. If the 6x2 is regularised then the chamfers create proud lines of concrete which might be a nuisance later.
-
You need uprights in pairs: called soldiers or strongbacks.
You can hire steel versions or use 6x2s.
-
You need frames to hold the formwork upright.
This is because I avoid kickers and these rods and nuts cannot be done up as tightly as the steel alternatives. The formwork is strong enough but not strong enough to self support upright.
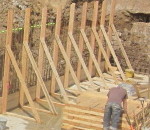
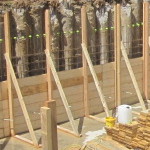
Triangular frames. I find 10.8m of 4x2 in 3.6m lengths is plenty to form the L shape with 2 screwed together, the floor plate and the diagonal. All on a maximum of 2m centres. The maximum is also dependent on the boards you will walk on on your scaffold.
-
You need a scaffold to stand on.
If you have already made the triangular frames then adding a horizontal support with a leg and 3 scaffold boards wide to stand on is simplicity itself.
I have known customers make me walk along cheap B&Q trestles not tall enough or strong enough.
I have known customers pay a scaffold company hundreds of pounds for loads of scaffold only used for a few hours.
My triangles are a hit when the scaffold is added very cheaply. See the note about screws and taking them out below.
6x2s can be used as the boards you will walk on as well.
Sometimes the legs for the scaffold are only 2x2. This client bought loads of 6x2 to re-use later so he used 6x2.
The formwork begins with screwing two pieces of 4x2 together to make an L shape. Then, with two other lengths of 4x2, triangles are made and screwed down so that the plumb face of the L is a board thickness off what needs to be face of concrete.
I always use Screwfix M6 Turbo Coach Screws, which are put in and taken out just as easily with a cordless drill or impact driver, without damaging timber.
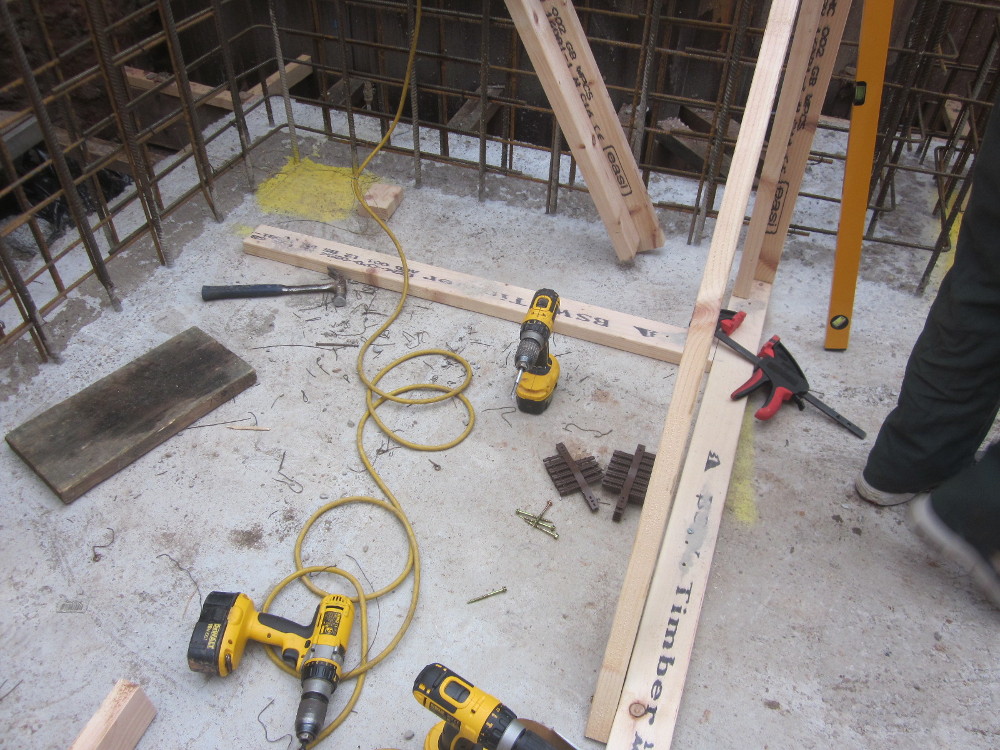
The formwork is held together with threaded rods and nuts.
I cut the nuts down to make thin nuts that go inside controlling the concrete width.
The first row of rods needs to be close to the bottom of the wall.
You cut through rods and nuts to remove the formwork.
If you let the boards outside one wall fly by, you can use a piece of 2x2 to screw the two forms together to make corners strong.
You might avoid cutting some standard lengths of timber. You might want to make corners even stronger.
In some way, whether with ply or timber, you need to fix across joints in boards so the joints don't spread under the weight of wet concrete.

I use a spreadsheet to work out how much timber I should buy.
Be careful to check that the size and length of timber you plan to buy is the same as the entries on the spreadsheet.
Obviously I cannot take responsibility for your results, but here it is free to download.
This page is about planning your formwork. This needs to be read and understood before you choose how you will form your walls.
In the next row on the menu page is my instruction manual to build formwork my way with timber, resin rods and nuts.
Inevitably there is repetition, but the other page will be more useful if you are about to build your walls. Here is a shortcut link to it.
If you want more explanation than you found on this page and other pages you can use the "answer all your emails" service, by paying £125 for it.
If you get to the end of this page and you are still tempted to hire in a formwork system be careful to understand the full cost of doing so. There are many reasons it will cost you more, for instance, hire longer than planned, damage charges, skills needed to get precise dimensions, they tell you to fill 3m high in sections = loads of leaks.
Back to the Basement Building Questions Answered menu.
|
Back to the Basement Building Construction Manual menu.
|
For a fixed fee of £199 I will answer all your questions by email. More details here.

|
|
|
|